Why So Blue?
We get many people wanting to rent an underwater camera and it’s understandable; divers want a memento of their underwater experiences and pretty fish. The trouble is, underwater photography is not as clear cut as taking a selfie with the latest smart phone.
You need to have brilliant buoyancy control and good air management, otherwise your pictures will be blury and you will only manage a few photo’s at that – as soon as people get a camera in their hand they are all over the place and they use their air up quicker. Aside from this, you need to learn about white balance – so your pictures don’t turn out blue, or red for that matter and then there’s ISO and aperture settings and… ahh! All of a sudden it seems too much hassle. But, never fear when the PADI Digital Underwater Photography Specialty is near. Dom explains more below:
“On a recent IDC (PADI Instructor Development Course) I had the pleasure of teaching my candidates how to teach the aforementioned PADI Specialty as part of their Master Scuba Diver Trainer package. During this course, some questions came up…
– Why do some underwater pictures look blue and boring?
– How do you bring the colour back and take awesome underwater photos with a point & shoot camera?
As an instructor it’s good to know as much about the topic you are teaching as possible.
A great way to understand how a camera works is to understand the nature of light and how we ‘see’ colour.
Light occupies a portion of the electromagnetic spectrum (wavelength range of 760nm – 400nm). Remember that experiment at school? with the prism that split white light into the colours of the rainbow. This shows that the white light contains all of the wavelengths of visible light. We see colour because of the way white light is reflected off, absorbed by or passes through an object. Objects that appear black absorb all of the wavelengths of light, while objects that appear white reflect all of them. Objects that appear coloured reflect only some of the wavelengths while others are absorbed.
These waves of reflected visible light hit the cones of our retina, and that info passes along the optic nerve to the visual cortex of the brain and causes us to ‘see’ colour. The particular wavelength of light that hits the cones corresponds to the colour we ‘see’.
Image sensors (often active pixel sensors (CMOS) Complementary Metal Oxide Semiconductor) in digital cameras detect variable strengths of light waves (attenuation) as they pass through or reflect off an object. This info is converted into bursts of current that the camera translates into an image. See, it’s pretty much the same as the way your eyes ‘see’.
Image sensors can be calibrated to ‘see’ other electromagnetic waves that we can’t see; this gives us night, thermal and x-ray imaging equipment.
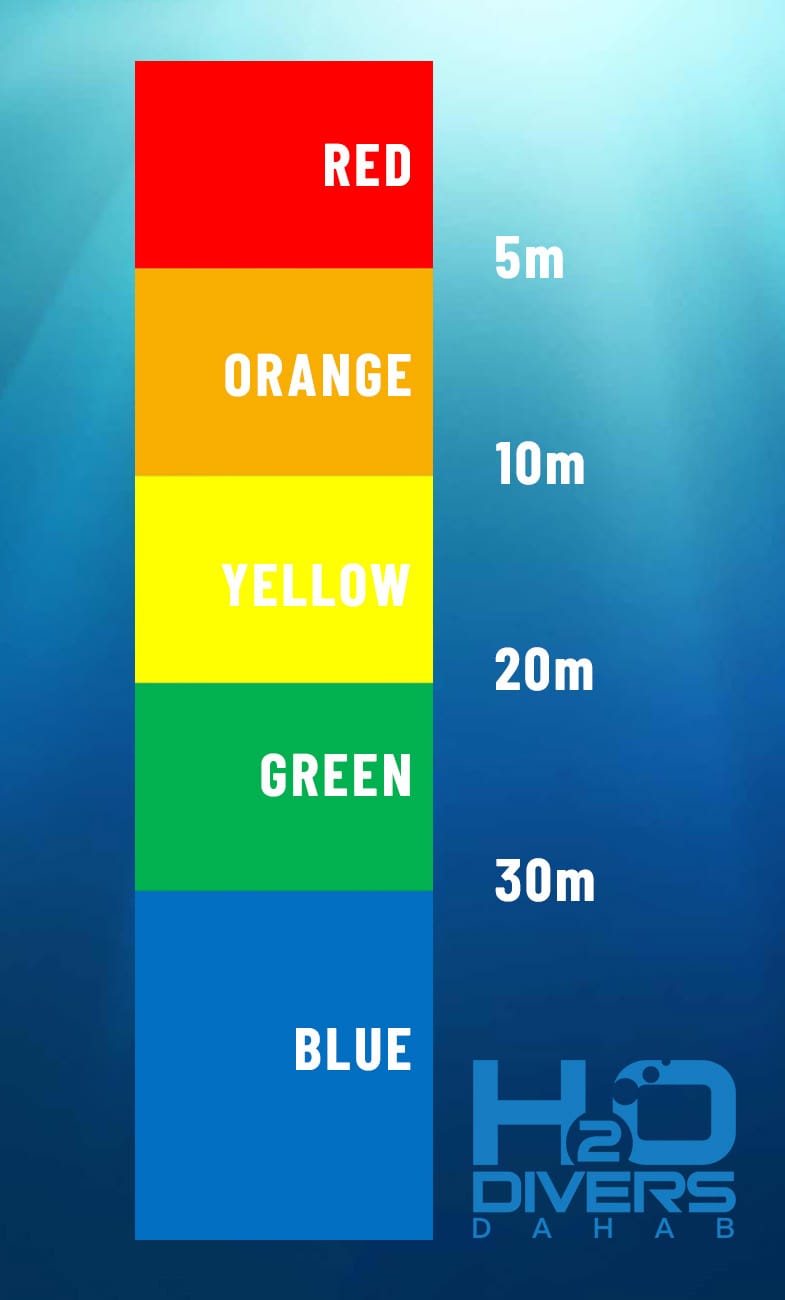
When light waves penetrate the dense medium of water (~770x more dense than air), some of it is ‘reflected’ off the surface (refraction). The light waves that do penetrate (at an angle that is perpendicular to the surface) are steady absorbed by the water. The depth the colour penetrates to depends on its wavelength. Red has the longest wavelength on the visible light spectrum, and only penetrates to ~5m. Blue has a shorter wavelength so penetrates much deeper.
So how can we bring the colour back?
STAY SHALLOW: The less deep the light waves have to travel, the more colour there will be in your photos.
Less depth = less light absorption
STROBES: Bring some light underwater. You can use a strobe or the internal flash on your camera or bring sternal strobes.
External Strobes are great, but they are expensive (£300 min for a point & shoot camera).
The internal flash on the camera but their range is limited U/W, as they are designed for surface use. Therefore you have to get close to the subject which is liable to swim off, especially if you are blasting it with a flash. This also saps your battery, reducing the number of shots you can take on a dive to an annoying level.
BRING REDNESS BACK: Manually adjusting White Balance or use an U/W filter or setting on a camera:
Using an U/W setting puts back some red into your photo and ‘warms it up’.
If your camera doesn’t have this setting, you can use a red filter. You can see what red filters does by taking a photo in the shallows or on land. The photo comes out …red! These options are easy to use, but have an optimum depth at which they work best.
Adjusting White Balance (if your camera has it) is better than using filters because it is adjusts for the colour absorption at the specific depth you are snapping pics. Your camera does this by using white as a base line. You tell the camera that a slate is white. It then alters the info coming from the sensor to ‘see’ the slate as white, which corrects for the colour absorption. Remember to readjust the white balance when changing depth.
GET THECNICAL– Play with some settings:
Adjusting the aperture (f-stop) – the more ‘open’ the aperture is, the more light is exposed to the camera’s sensors. It’s a bit like the pupils in your eyes. It can lead to the photo being over-exposed. You can off-set this with a faster Shutter Speed or with EV (exposure) settings. Playing with the ISO effects the sensitivity of the sensors.
SORT IT OUT LATER– Use image editing software. Great – but there is only so much you can do with a photo that is SO blue
A popular option people take is to of course practice using a camera underwater, but in the mean time – instead of renting a camera – they rent Jenny instead! Jenny is a keen photographer and has all the fancy camera gear already. She comes along on the dive with you and you can focus on the dive whilst she does the hard work.